
Screen printing requires precise mesh tension to achieve professional-quality results, making a screen stretcher an essential tool for any serious printer. Whether you're working in a commercial print shop or setting up a home-based operation, understanding how to properly operate this equipment will significantly impact your print quality and production efficiency. A properly tensioned screen ensures consistent ink coverage, sharp detail reproduction, and extended screen life, ultimately saving both time and money in your printing operations.
Understanding Screen Stretcher Components
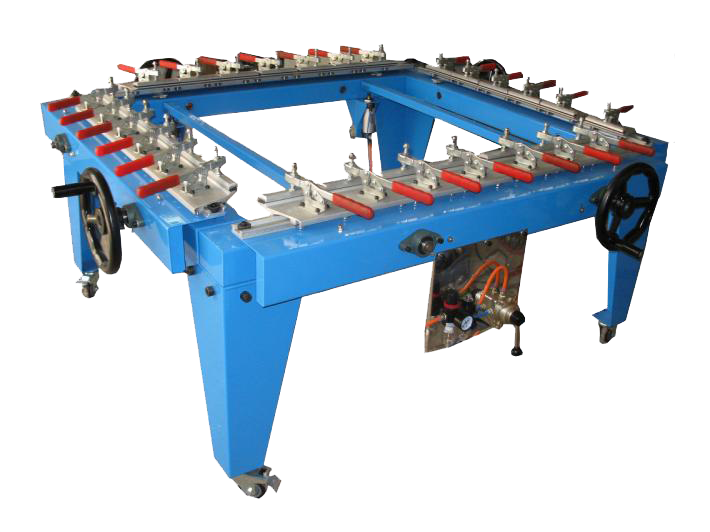
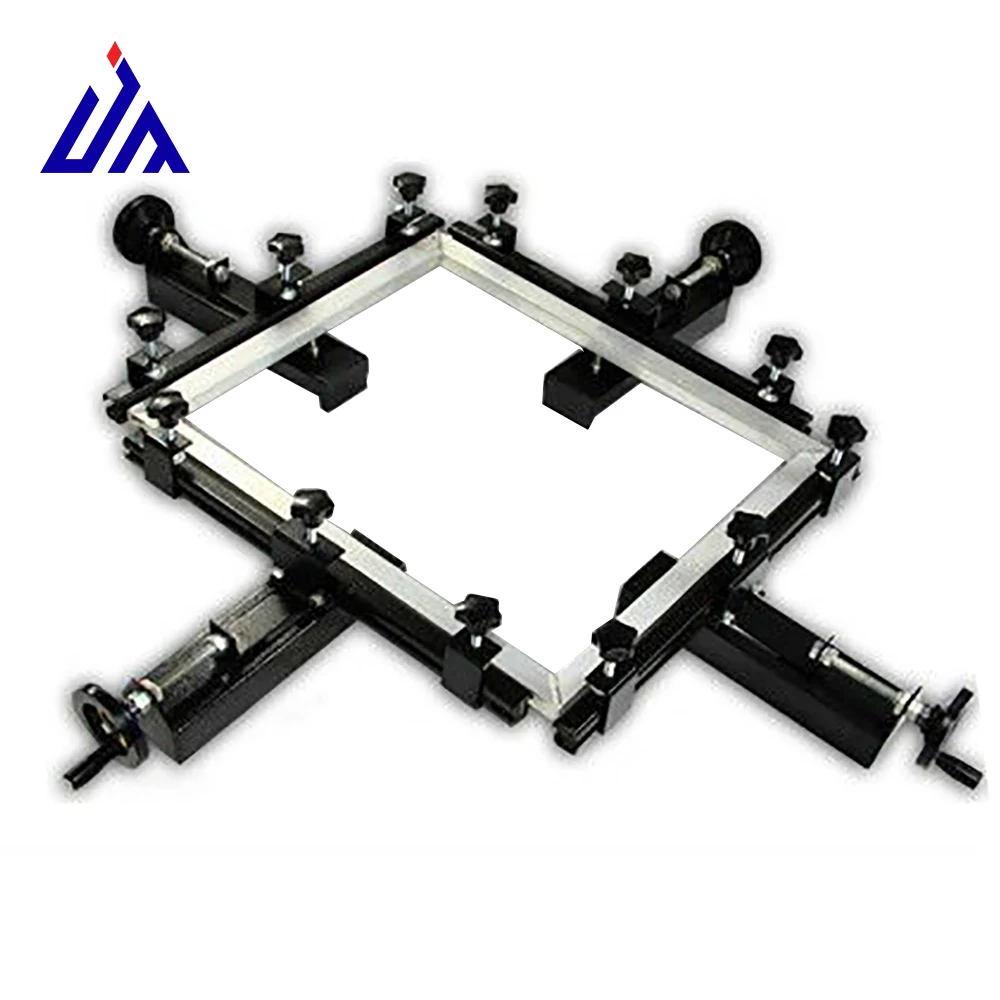
Frame Clamping System
The frame clamping system forms the backbone of any effective screen stretcher operation. Modern units feature adjustable clamps that accommodate various frame sizes while maintaining uniform pressure distribution across the entire perimeter. These clamps must securely hold aluminum or wood frames without causing damage or deformation during the stretching process. Quality clamping systems include protective padding to prevent scratches and ensure consistent grip strength throughout the tensioning cycle.
Proper clamp adjustment requires careful attention to frame thickness and material composition. Aluminum frames typically require less clamping pressure than wooden frames due to their superior strength-to-weight ratio. The clamping mechanism should engage gradually to prevent sudden jolts that could damage both frame and mesh during initial positioning.
Tension Measurement Tools
Accurate tension measurement distinguishes professional screen stretching from amateur attempts. Digital tension meters provide precise readings in Newtons per centimeter, allowing operators to achieve consistent results across multiple screens. These instruments eliminate guesswork and ensure each screen meets specific tension requirements for different printing applications.
Calibration of tension measurement tools requires regular attention to maintain accuracy. Environmental factors such as temperature and humidity can affect readings, necessitating periodic adjustments to maintain measurement precision. Professional screen stretchers often include built-in calibration features to simplify this maintenance process.
Preparation Steps Before Stretching
Frame Inspection and Cleaning
Thorough frame inspection prevents costly mistakes and ensures optimal stretching results. Check for nicks, dents, or rough edges that could damage the mesh during stretching. Any imperfections should be smoothed with fine sandpaper or filed smooth before proceeding. Clean frames with degreasing agents to remove oils, dirt, or previous adhesive residues that might interfere with mesh adhesion.
Frame geometry plays a crucial role in successful stretching outcomes. Measure diagonals to verify square construction, as out-of-square frames will create uneven tension patterns that compromise print quality. Wooden frames should be checked for warping or splitting, while aluminum frames need inspection for straightness and proper corner joints.
Mesh Selection and Handling
Choosing appropriate mesh specifications directly impacts stretching success and final print quality. Mesh count, thread diameter, and fabric composition must align with intended printing applications and ink types. Higher mesh counts require more careful handling during stretching to prevent thread breakage or weave distortion.
Pre-stretching mesh conditioning can improve final results by relieving manufacturing stresses and allowing fabric relaxation. Some operators prefer to lightly pre-stretch mesh by hand before machine stretching to identify potential weak points or manufacturing defects. This preliminary step helps prevent unexpected failures during the mechanical stretching process.
Operating the Screen Stretcher Equipment
Initial Setup and Configuration
Proper machine setup forms the foundation for successful screen stretching operations. Begin by adjusting the stretching platform to accommodate your frame size, ensuring adequate clearance around all edges. Position the screen stretcher in a well-lit area with sufficient workspace for comfortable operation and mesh handling.
Verify that all pneumatic or hydraulic systems operate within specified pressure ranges before beginning work. Check oil levels in hydraulic systems and inspect air lines for leaks in pneumatic units. These preliminary checks prevent equipment malfunctions that could damage expensive mesh or frames during operation.
Loading and Positioning Procedures
Correct mesh positioning determines stretching uniformity and final screen quality. Center the mesh over the frame with equal overhang on all sides, typically allowing 2-3 inches of excess material beyond each frame edge. This overhang provides adequate material for clamping while ensuring complete frame coverage after stretching.
Mesh orientation affects printing characteristics and should align with the intended printing direction. For most applications, position the mesh so that the thread direction runs parallel to the squeegee stroke direction. This alignment minimizes mesh movement during printing and improves ink deposit consistency.
Tensioning Process and Techniques
Gradual Tension Application
Successful screen stretching requires patience and systematic tension application rather than rushed procedures. Begin with minimal tension to secure the mesh position, then gradually increase tension in small increments while monitoring the mesh response. Rapid tensioning can cause thread breakage, uneven stress distribution, or premature mesh failure.
Monitor mesh behavior throughout the tensioning process, watching for signs of excessive stress or uneven stretching. Properly stretched mesh will exhibit uniform surface appearance without wrinkles, sags, or areas of excessive tightness. The mesh should produce a consistent tone when lightly tapped across different areas of the screen.
Achieving Target Tension Values
Different printing applications require specific tension ranges for optimal performance. Fine detail work typically demands higher tension values to minimize mesh movement and improve registration accuracy. Conversely, heavy ink deposits or textile applications may perform better with moderate tension levels that allow greater ink flow through the mesh openings.
Temperature compensation becomes important when stretching in varying environmental conditions. Mesh materials expand and contract with temperature changes, affecting final tension values as conditions stabilize. Professional operators often slightly over-tension screens in cold conditions or under-tension in warm environments to compensate for these thermal effects.
Quality Control and Testing
Tension Uniformity Verification
Systematic tension measurement across the entire screen surface ensures consistent printing performance. Take readings at multiple points in a grid pattern, recording values to identify any significant variations. Professional standards typically allow tension variations of no more than 2-3 Newtons per centimeter across the screen surface.
Document tension measurements for future reference and quality tracking. This data helps identify patterns in stretching performance and provides valuable information for troubleshooting print quality issues. Consistent record-keeping also supports process improvement initiatives and equipment maintenance scheduling.
Screen Performance Testing
Conducting test prints validates stretching quality and identifies potential issues before production use. Print a solid color area to check for uniformity and density consistency across the entire image area. Any variations in print density typically indicate uneven mesh tension or improper stretching technique.
Fine line resolution tests reveal mesh stability and registration capabilities under actual printing conditions. Print registration marks or fine detail patterns to verify that the screen maintains dimensional stability throughout the printing stroke. Poor registration performance often indicates insufficient tension or uneven stress distribution in the stretched mesh.
Maintenance and Troubleshooting
Equipment Maintenance Requirements
Regular maintenance extends equipment life and ensures consistent stretching performance. Lubricate moving parts according to manufacturer specifications, paying particular attention to clamp mechanisms and tension adjustment components. Clean tensioning surfaces regularly to remove adhesive residues and fabric particles that could interfere with proper operation.
Calibrate tension measurement systems periodically using certified reference standards. Environmental factors and normal wear can affect measurement accuracy over time, making regular calibration essential for consistent results. Document calibration dates and results to maintain quality system requirements and identify trends in equipment performance.
Common Problems and Solutions
Uneven tension patterns typically result from improper frame preparation, incorrect mesh positioning, or worn equipment components. Address frame irregularities before stretching and ensure mesh positioning remains consistent throughout the tensioning process. Replace worn clamp pads or damaged tensioning components to maintain uniform pressure distribution.
Premature mesh failure often indicates excessive tensioning speed, inadequate frame preparation, or mesh quality issues. Reduce tensioning rates and verify frame surface smoothness to minimize stress concentrations. Work with reputable mesh suppliers to ensure material quality meets application requirements and stretching demands.
FAQ
What tension level should I use for different mesh counts
Tension requirements vary significantly with mesh count and intended application. Fine mesh counts (200-400) typically require 15-25 N/cm, while coarser meshes (80-160) perform well at 18-28 N/cm. Textile printing often uses lower tensions (12-20 N/cm) to accommodate heavy ink deposits, while fine detail graphics work benefits from higher tensions (20-30 N/cm) for improved registration and print sharpness.
How do I know when my screen is properly stretched
A properly stretched screen exhibits uniform surface appearance without wrinkles, sags, or excessive tightness in any area. The mesh should produce a consistent tone when tapped lightly across different regions. Tension meter readings should fall within specified ranges for your application and remain consistent across the entire screen surface. The screen should maintain its tension for at least 24 hours without significant relaxation.
Can I re-stretch a screen that has lost tension
Re-stretching is possible but depends on the original stretching method and mesh condition. Screens attached with mechanical fasteners can often be re-tensioned if the mesh remains undamaged. However, adhesive-mounted screens typically cannot be re-stretched effectively. Evaluate mesh condition carefully, looking for thread damage, permanent deformation, or adhesive failure before attempting re-stretching procedures.
What causes mesh to break during stretching
Mesh breakage usually results from excessive tensioning speed, poor mesh quality, or frame preparation issues. Sharp edges or rough surfaces on frames create stress concentrations that lead to thread failure. Defective mesh with weak threads or manufacturing flaws will fail under normal tensioning loads. Always inspect frames for smoothness and use gradual tensioning procedures to minimize breakage risk.